
27. JUnit Sampler Tutorial
This tutorial attempts to explain the basic design, functionality and usage of the new JUnit Sampler for JMeter. The sampler was introduced in version 2.1.2 release of JMeter. Earlier releases do not have the sampler.
27.1 Design
The current implementation supports standard JUnit convention and extensions, like oneTimeSetUp and oneTimeTearDown. Other features can be added on request. The sampler works like the JavaSampler with some differences.
- Rather than use JMeter's test interface, it scans the jar files for classes extending JUnit's TestCase class. This means any class or subclass.
- JUnit test jar files are copied to jmeter/lib/junit instead of jmeter/lib
-
JUnit sampler does not use name/value pairs for configuration. The sampler assumes
setUp and tearDown will configure the test correctly.
Note: setUp and tearDown methods must be declared public, so that JMeter can use it.
- The sampler measures the elapsed time only for the test method and does not include setUp and tearDown.
- Each time the test method is called, JMeter will pass the result to the listeners.
- Support for oneTimeSetUp and oneTimeTearDown is done as a method. Since JMeter is multi-threaded, we cannot call oneTimeSetUp/oneTimeTearDown the same way maven does it.
- The sampler reports unexpected exceptions as errors.
27.2 Functionality
Here is a description of the functionality.
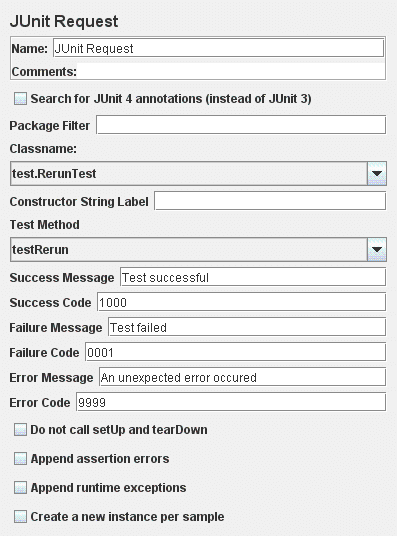
- Name
- name for the sample. This is the same as all JMeter samplers.
- Package Filter
- provides a way to filter the classes by package name.
- Classname
- the name of the class to test. The sampler will scan the jar files in jmeter/lib/ext and jmeter/lib/junit for classes extending JUnit's TestCase.
- Constructor String
- a string to pass to the string constructor of the test class.
- Test Method
- the name of the method to test in the sampler.
- Success message
- a descriptive message indicating what success means.
- Success code
- an unique code indicating the test was successful.
- Failure message
- a descriptive message indicating what failure means.
- Failure code
- an unique code indicating the test failed
- Error message
- a description for errors
- Error code
- some code for errors. Does not need to be unique
- Do not call setUp and tearDown
-
set the sampler not
to call setUp and tearDown. By default, setUp and
tearDown should be called. Not calling those methods could affect the test and
make it inaccurate. This option should be used with caution.
If the selected method is oneTimeSetUp or oneTimeTearDown, this option should be checked.
- Append assertion error
- By default, the sampler will not append the assert failures to the failure message. To see the message in the result tree, check the option.
- Append runtime exception
- By default, the sampler will not append the exceptions to the failure message. To see the stacktrace, check the option
The current implementation of the sampler will try to create an instance using the string constructor first. If the test class does not declare a string constructor, the sampler will look for an empty constructor. Example below:
public class myTestCase {
  public myTestCase() {}
}
String Constructor:
public class myTestCase {
  public myTestCase(String text) {
    super(text);
  }
}
By default, JMeter will provide some default values for the success/failure code and message. Users should define a set of unique success and failure codes and use them uniformly across all tests.
27.3 Usage
Here is a short step-by-step.
- Write your JUnit test and jar the classes
- Copy and paste the jar files into jmeter/lib/junit directory
- Start JMeter
- Select Test Plan
- Right click
- Select Thread Group
- Right click
- Enter my unit test in the name
- Enter the package of your JUnit test
- Select the class you want to test
- Select a method to test
- Enter test successful in success message
- Enter 1000 in success code
- Enter test failed in failure message
- Enter 0001 in failure code
- Select the Thread Group
- Right click
One benefit of the JUnit sampler is it allows the user to select any method from a variety of unit tests to create a test plan. This should reduce the amount of code an user needs to write to create a variety of test scenarios. From a basic set of test methods, different sequences and tests can be created using JMeter's GUI.
For example:
Test Plan1
TestCase1.testImportCustomer
TestCase2.testUpdateRandomCustomer
TestCase1.testSelect100
TestCase2.testUpdateOrder
TestCase1.testSelect1000
TestPlan2
TestCase1.testImportCustomer
TestCase1.testSelect100
TestCase1.testSelect1000
TestCase2.testAdd100Customers
27.4 General Guidelines
Here are some general guidelines for writing JUnit tests so they work well with JMeter. Since JMeter runs multi-threaded, it is important to keep certain things in mind.
- Write the setUp and tearDown methods so they are thread safe. This generally means avoid using static members.
- Make the test methods discrete units of work and not long sequences of actions. By keeping the test method to a discrete operation, it makes it easier to combine test methods to create new test plans.
- Avoid making test methods depend on each other. Since JMeter allows arbitrary sequencing of test methods, the runtime behavior is different than the default JUnit behavior.
- If a test method is configurable, be careful about where the properties are stored. Reading the properties from the Jar file is recommended.
- Each sampler creates an instance of the test class, so write your test so the setup happens in oneTimeSetUp and oneTimeTearDown.
- If you select a class and no methods show up, it means the sampler had a problem creating an instance of the test class. The best way to debug this is to add some System.out to your class constructor and see what is happening.