
1. Getting Started
1.0 Overview
When using JMeter you will usually follow this process:1.0.1 Test plan building
To do that, you will run JMeter in GUI Mode.
Then you can either choose to record the application from a browser, or native application.
You can use for that the menu
Note you can also manually build your plan. Ensure you read this documentation to understand major concepts.
You will also debug it using one of these options:- on Thread Group
and View Results Tree renderers or Testers (CSS/JQUERY, JSON, Regexp, XPath).
Ensure you follow best-practices when building your Test Plan.
1.0.2 Load Test running
Once your Test Plan is ready, you can start your Load Test. The first step is to configure the injectors that will run JMeter, this as for any other Load Testing tool includes:
- Correct machine sizing in terms of CPU, memory and network
- OS Tuning
- Java setup: Ensure you install the latest version of Java supported by JMeter
- Increase the Java Heap size. By default JMeter runs with a heap of 1 GB, this might not be enough for your test and depends on your test plan and number of threads you want to run
Using CLI mode, you can generate a CSV (or XML) file containing results and have JMeter generate an HTML report at end of Load Test. JMeter will by default provide a summary of load test while it's running.
You can also have real-time results during your test using Backend Listener.
1.0.3 Load Test analysis
Once your Load Test is finished, you can use the HTML report to analyze your load test.1.0.4 Let's start
The easiest way to begin using JMeter is to first download the latest production release and install it. The release contains all of the files you need to build and run most types of tests, e.g. Web (HTTP/HTTPS), FTP, JDBC, LDAP, Java, JUnit and more.
If you want to perform JDBC testing, then you will, of course, need the appropriate JDBC driver from your vendor. JMeter does not come with any JDBC drivers.
JMeter includes the JMS API jar, but does not include a JMS client implementation. If you want to run JMS tests, you will need to download the appropriate jars from the JMS provider.
Next, start JMeter and go through the Building a Test Plan section of the User Guide to familiarize yourself with JMeter basics (for example, adding and removing elements).
Finally, go through the appropriate section on how to build a specific type of Test Plan. For example, if you are interested in testing a Web application, then see the section Building a Web Test Plan. The other specific Test Plan sections are:
- Advanced Web Test Plan
- JDBC
- FTP
- JMS Point-to-Point
- JMS Topic
- LDAP
- LDAP Extended
- WebServices (SOAP)
- Building Test Plan programmatically
Once you are comfortable with building and running JMeter Test Plans, you can look into the various configuration elements (timers, listeners, assertions, and others) which give you more control over your Test Plans.
1.1 Requirements
JMeter requires that your computing environment meets some minimum requirements.
1.1.1 Java Version
Because JMeter uses only standard Java APIs, please do not file bug reports if your JRE fails to run JMeter because of JRE implementation issues.
1.1.2 Operating Systems
JMeter is a 100% Java application and should run correctly on any system that has a compliant Java implementation.
Operating systems tested with JMeter can be viewed on this page on JMeter wiki.
Even if your OS is not listed on the wiki page, JMeter should run on it provided that the JVM is compliant.
1.2 Optional
If you plan on doing JMeter development, then you will need one or more optional packages listed below.
1.2.1 Java Compiler
If you want to build the JMeter source or develop JMeter plugins, then you will need a fully compliant JDK 8 or higher.
1.2.2 SAX XML Parser
JMeter comes with Apache's Xerces XML parser. You have the option of telling JMeter to use a different XML parser. To do so, include the classes for the third-party parser in JMeter's classpath, and update the jmeter.properties file with the full classname of the parser implementation.
1.2.3 Email Support
JMeter has extensive Email capabilities. It can send email based on test results, and has a POP3(S)/IMAP(S) sampler. It also has an SMTP(S) sampler.
1.2.4 SSL Encryption
To test a web server using SSL encryption (HTTPS), JMeter requires that an implementation of SSL be provided, as is the case with Sun Java 1.4 and above. If your version of Java does not include SSL support, then it is possible to add an external implementation. Include the necessary encryption packages in JMeter's classpath. Also, update system.properties to register the SSL Provider.
JMeter HTTP defaults to protocol level TLS. This can be changed by editing the JMeter property https.default.protocol in jmeter.properties or user.properties.
The JMeter HTTP samplers are configured to accept all certificates, whether trusted or not, regardless of validity periods, etc. This is to allow the maximum flexibility in testing servers.
If the server requires a client certificate, this can be provided.
There is also the SSL Manager, for greater control of certificates.
The SMTP sampler can optionally use a local trust store or trust all certificates.
1.2.5 JDBC Driver
You will need to add your database vendor's JDBC driver to the classpath if you want to do JDBC testing. Make sure the file is a jar file, not a zip.
1.2.6 JMS client
JMeter now includes the JMS API from Apache Geronimo, so you just need to add the appropriate JMS Client implementation jar(s) from the JMS provider. Please refer to their documentation for details. There may also be some information on the JMeter Wiki.
1.2.7 Libraries for ActiveMQ JMS
You will need to add the jar activemq-all-X.X.X.jar to your classpath, e.g. by storing it in the lib/ directory.
See ActiveMQ initial configuration page for details.
1.3 Installation
We recommend that most users run the latest release.
To install a release build, simply unzip the zip/tar file into the directory where you want JMeter to be installed. Provided that you have a JRE/JDK correctly installed and the JAVA_HOME environment variable set, there is nothing more for you to do.
The installation directory structure should look something like this (where X.Y is version number):
apache-jmeter-X.Y
apache-jmeter-X.Y/bin
apache-jmeter-X.Y/docs
apache-jmeter-X.Y/extras
apache-jmeter-X.Y/lib/
apache-jmeter-X.Y/lib/ext
apache-jmeter-X.Y/lib/junit
apache-jmeter-X.Y/licenses
apache-jmeter-X.Y/printable_docs
You can rename the parent directory (i.e. apache-jmeter-X.Y) if you want, but do not change any of the sub-directory names.
1.4 Running JMeter
To run JMeter, run the jmeter.bat (for Windows) or jmeter (for Unix) file. These files are found in the bin directory. After a short time, the JMeter GUI should appear.
There are some additional scripts in the bin directory that you may find useful. Windows script files (the .CMD files require Win2K or later):
- jmeter.bat
- run JMeter (in GUI mode by default)
- jmeterw.cmd
- run JMeter without the windows shell console (in GUI mode by default)
- jmeter-n.cmd
- drop a JMX file on this to run a CLI mode test
- jmeter-n-r.cmd
- drop a JMX file on this to run a CLI mode test remotely
- jmeter-t.cmd
- drop a JMX file on this to load it in GUI mode
- jmeter-server.bat
- start JMeter in server mode
- mirror-server.cmd
- runs the JMeter Mirror Server in CLI mode
- shutdown.cmd
- Run the Shutdown client to stop a CLI mode instance gracefully
- stoptest.cmd
- Run the Shutdown client to stop a CLI mode instance abruptly
There are a few environment variables, that can be used to customize the JVM settings for JMeter. An easy way to set those is by creating a file named setenv.bat in the bin directory. Such a file could look like:
rem This is the content of bin\setenv.bat,
rem it will be called by bin\jmeter.bat

set JVM_ARGS=-Xms1024m -Xmx1024m -Dpropname=value
The JVM_ARGS can be used to override JVM settings in the jmeter.bat script and will get set when starting JMeter, e.g.:
jmeter -t test.jmx …
The following environment variables can be defined:
- DDRAW
- JVM options to influence usage of direct draw, e.g. -Dsun.java2d.ddscale=true. Default is empty.
- GC_ALGO
- JVM garbage collector options. Defaults to -XX:+UseG1GC -XX:MaxGCPauseMillis=250 -XX:G1ReservePercent=20
- HEAP
- JVM memory settings used when starting JMeter. Defaults to -Xms1g -Xmx1g -XX:MaxMetaspaceSize=256m
- JMETER_BIN
- JMeter bin directory (must end in \). Value will have been guessed, when setenv.bat is called.
- JMETER_COMPLETE_ARGS
- If set indicates, that JVM_ARGS and JMETER_OPTS are to be used, only. All other options like HEAP and GC_ALGO will be ignored. Default is empty.
- JMETER_HOME
- installation directory. Will be guessed from location of jmeter.bat
- JMETER_LANGUAGE
- Java runtime options to specify used language. Defaults to: -Duser.language="en" -Duser.region="EN"
- JM_LAUNCH
- Name of the java executable, like java.exe (default) or javaw.exe
- JVM_ARGS
- Java options to be used when starting JMeter. These will be added last to the java command. Default is empty
Un*x script files; should work on most Linux/Unix systems:
- jmeter
- run JMeter (in GUI mode by default). Defines some JVM settings which may not work for all JVMs.
- jmeter-server
- start JMeter in server mode (calls jmeter script with appropriate parameters)
- jmeter.sh
- very basic JMeter script (You may need to adapt JVM options like memory settings).
- mirror-server.sh
- runs the JMeter Mirror Server in CLI mode
- shutdown.sh
- Run the Shutdown client to stop a CLI mode instance gracefully
- stoptest.sh
- Run the Shutdown client to stop a CLI mode instance abruptly
It may be necessary to set a few environment variables to configure the JVM used by JMeter. Those variables can be either set directly in the shell starting the jmeter script. For example setting the variable JVM_ARGS will override most pre-defined settings, for example
JVM_ARGS="-Xms1024m -Xmx1024m" jmeter -t test.jmx [etc.]
will override the HEAP settings in the script.
To set those variables permanently, you can place them in a file called setenv.sh in the bin directory. This file will be sourced when running JMeter by calling the jmeter script. An example for bin/setenv.sh could look like:
# This is the file bin/setenv.sh,
# it will be sourced in by bin/jmeter

# Use a bigger heap, but a smaller metaspace, than the default
export HEAP="-Xms1G -Xmx1G -XX:MaxMetaspaceSize=192m"

# Try to guess the locale from the OS. The space as value is on purpose!
export JMETER_LANGUAGE=" "
The following environment variables can be defined:
- GC_ALGO
- Java runtime options to specify JVM garbage collection algorithm. Defaults to -XX:+UseG1GC -XX:MaxGCPauseMillis=250 -XX:G1ReservePercent=20
- HEAP
- Java runtime options for memory management used when JMeter is started. Defaults to -Xms1g -Xmx1g -X:MaxMetaspaceSize=256m
- JAVA_HOME
- Must point at your Java Development Kit installation. Required to run the with the "debug" argument. On some OSes it JMeter will try its best to guess the location of the JVM.
- JMETER_COMPLETE_ARGS
- If set indicates, that JVM_ARGS and JMETER_OPTS are to be used, only. All other options like HEAP and GC_ALGO will be ignored. Default is empty.
- JMETER_HOME
- May point to your JMeter install dir. If empty it will be set relative to the jmeter script.
- JMETER_LANGUAGE
- Java runtime options to specify used language. Defaults to -Duser.language=en -Duser.region=EN
- JMETER_OPTS
- Java runtime options used when JMeter is started. Special options for operating systems might be added by JMeter.
- JRE_HOME
- Must point at your Java Runtime installation. Defaults to JAVA_HOME if empty. If JRE_HOME and JAVA_HOME are both empty, JMeter will try to guess JAVA_HOME. If JRE_HOME and JAVA_HOME are both set, JAVA_HOME is used.
- JVM_ARGS
- Java options to be used when starting JMeter. These will be added before JMETER_OPTS and after the other JVM options. Default is empty
1.4.1 JMeter's Classpath
JMeter automatically finds classes from jars in the following directories:
- JMETER_HOME/lib
- used for utility jars
- JMETER_HOME/lib/ext
- used for JMeter components and plugins
If you have developed new JMeter components, then you should jar them and copy the jar into JMeter's lib/ext directory. JMeter will automatically find JMeter components in any jars found here. Do not use lib/ext for utility jars or dependency jars used by the plugins; it is only intended for JMeter components and plugins.
If you don't want to put JMeter plugin jars in the lib/ext directory, then define the property search_paths in jmeter.properties.
Utility and dependency jars (libraries etc) can be placed in the lib directory.
If you don't want to put such jars in the lib directory, then define the property user.classpath or plugin_dependency_paths in jmeter.properties. See below for an explanation of the differences.
Other jars (such as JDBC, JMS implementations and any other support libraries needed by the JMeter code) should be placed in the lib directory - not the lib/ext directory, or added to user.classpath.
You can also install utility Jar files in $JAVA_HOME/jre/lib/ext, or you can set the property user.classpath in jmeter.properties
Note that setting the CLASSPATH environment variable will have no effect. This is because JMeter is started with "java -jar", and the java command silently ignores the CLASSPATH variable, and the -classpath/-cp options when -jar is used.
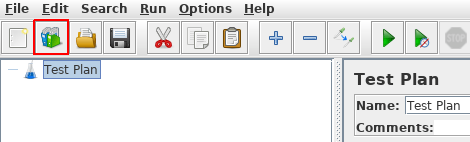
1.4.2 Create Test Plan from Template
You have the ability to create a new Test Plan from existing template.
To do so you use the menu
or Templates icon:
A popup appears, you can then choose a template among the list:
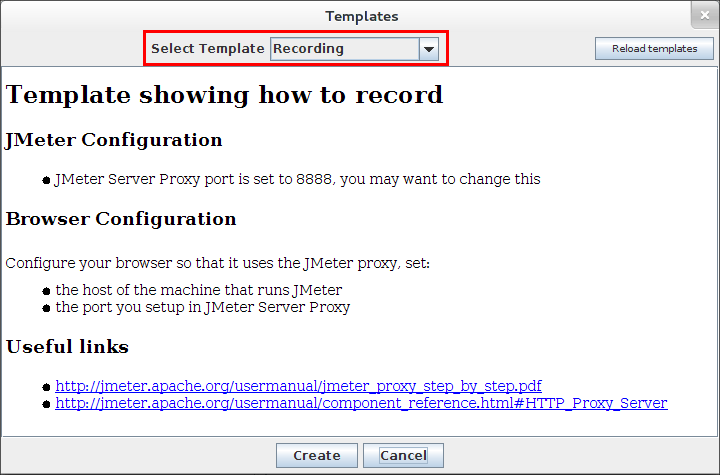
Some templates may need parameters input from the user. For theses ones, after a click on the create button,
a new window will appear as follow :
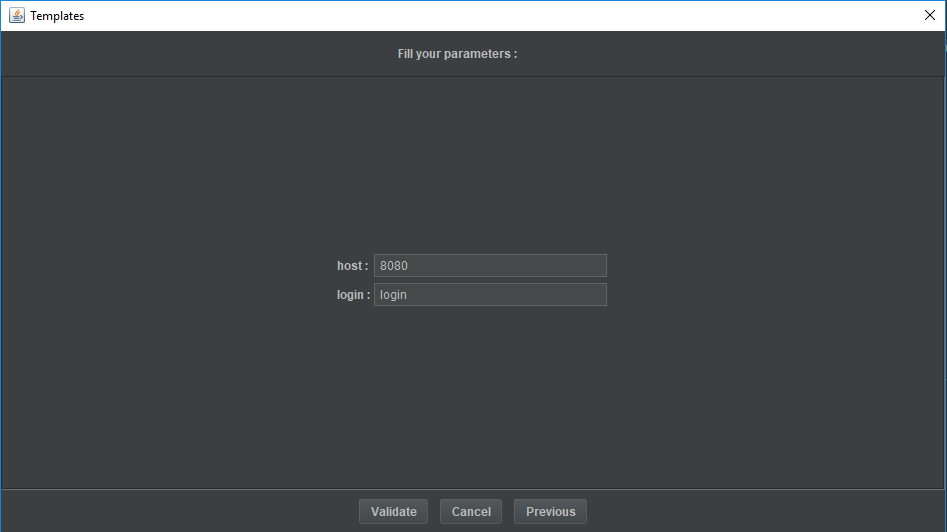
When you are done with parameters, click on the Validate button and the template will be created.
A documentation for each template explains what to do once test plan is created from template.
1.4.3 Using JMeter behind a proxy
If you are testing from behind a firewall/proxy server, you may need to provide JMeter with the firewall/proxy server hostname and port number. To do so, run the jmeter[.bat] file from a command line with the following parameters:
- -E
- [proxy scheme to use - optional - for non-http]
- -H
- [proxy server hostname or ip address]
- -P
- [proxy server port]
- -N
- [nonproxy hosts] (e.g. *.apache.org|localhost)
- -u
- [username for proxy authentication - if required]
- -a
- [password for proxy authentication - if required]
jmeter -E https -H my.proxy.server -P 8000 -u username -a password -N localhost
You can also use --proxyScheme, --proxyHost, --proxyPort, --username, and --password as parameter names
If the proxy scheme is provided, then JMeter sets the following System properties:
- http.proxyScheme
If the proxy host and port are provided, then JMeter sets the following System properties:
- http.proxyHost
- http.proxyPort
- https.proxyHost
- https.proxyPort
The user and password used for a proxy can be given by the System properties http.proxyUser and http.proxyUser. They will get overridden by the above arguments or values set in the HTTP Samplers.
If a nonproxy host list is provided, then JMeter sets the following System properties:
- http.nonProxyHosts
- https.nonProxyHosts
So if you don't wish to set both http and https proxies, you can define the relevant properties in system.properties instead of using the command-line parameters.
Proxy Settings can also be defined in a Test Plan, using either the HTTP Request Defaults configuration or the HTTP Request sampler elements.
1.4.4 CLI Mode (Command Line mode was called NON GUI mode)
For load testing, you must run JMeter in this mode (Without the GUI) to get the optimal results from it. To do so, use the following command options:
- -n
- This specifies JMeter is to run in cli mode
- -t
- [name of JMX file that contains the Test Plan].
- -l
- [name of JTL file to log sample results to].
- -j
- [name of JMeter run log file].
- -r
- Run the test in the servers specified by the JMeter property "remote_hosts"
- -R
- [list of remote servers] Run the test in the specified remote servers
- -g
- [path to CSV file] generate report dashboard only
- -e
- generate report dashboard after load test
- -o
- output folder where to generate the report dashboard after load test. Folder must not exist or be empty
The script also lets you specify the optional firewall/proxy server information:
- -H
- [proxy server hostname or ip address]
- -P
- [proxy server port]
jmeter -n -t my_test.jmx -l log.jtl -H my.proxy.server -P 8000
If the property jmeterengine.stopfail.system.exit is set to true (default is false), then JMeter will invoke System.exit(1) if it cannot stop all threads. Normally this is not necessary.
1.4.5 Server Mode
For distributed testing, run JMeter in server mode on the remote node(s), and then control the server(s) from the GUI. You can also use CLI mode to run remote tests. To start the server(s), run jmeter-server[.bat] on each server host.
The script also lets you specify the optional firewall/proxy server information:
- -H
- [proxy server hostname or ip address]
- -P
- [proxy server port]
jmeter-server -H my.proxy.server -P 8000
If you want the server to exit after a single test has been run, then define the JMeter property server.exitaftertest=true.
To run the test from the client in CLI mode, use the following command:
jmeter -n -t testplan.jmx -r [-Gprop=val] [-Gglobal.properties] [-X]where:
- -G
- is used to define JMeter properties to be set in the servers
- -X
- means exit the servers at the end of the test
- -Rserver1,server2
- can be used instead of -r to provide a list of servers to start. Overrides remote_hosts, but does not define the property.
If the property jmeterengine.remote.system.exit is set to true (default is false), then JMeter will invoke System.exit(0) after stopping RMI at the end of a test. Normally this is not necessary.
1.4.6 Overriding Properties Via The Command Line
Java system properties and JMeter properties can be overridden directly on the command lin (instead of modifying jmeter.properties). To do so, use the following options:
- -D[prop_name]=[value]
- defines a java system property value.
- -J[prop_name]=[value]
- defines a local JMeter property.
- -G[prop_name]=[value]
- defines a JMeter property to be sent to all remote servers.
- -G[propertyfile]
- defines a file containing JMeter properties to be sent to all remote servers.
- -L[category]=[priority]
- overrides a logging setting, setting a particular category to the given priority level.
The -L flag can also be used without the category name to set the root logging level.
Examples:
jmeter -Duser.dir=/home/mstover/jmeter_stuff \
    -Jremote_hosts=127.0.0.1 -Ljmeter.engine=DEBUG
jmeter -LDEBUG
1.4.7 Logging and error messages
Here is an example log4j2.xml file which defines two log appenders and loggers for each category.
<Configuration status="WARN" packages="org.apache.jmeter.gui.logging">

  <Appenders>

    <!-- The main log file appender to jmeter.log in the directory from which JMeter was launched, by default. -->
    <File name="jmeter-log" fileName="${sys:jmeter.logfile:-jmeter.log}" append="false">
      <PatternLayout>
        <pattern>%d %p %c{1.}: %m%n</pattern>
      </PatternLayout>
    </File>

    <!-- Log appender for GUI Log Viewer. See below. -->
    <GuiLogEvent name="gui-log-event">
      <PatternLayout>
        <pattern>%d %p %c{1.}: %m%n</pattern>
      </PatternLayout>
    </GuiLogEvent>

  </Appenders>

  <Loggers>

    <!-- Root logger -->
    <Root level="info">
      <AppenderRef ref="jmeter-log" />
      <AppenderRef ref="gui-log-event" />
    </Root>

    <!-- SNIP -->

    <!--
      # Apache HttpClient logging examples
    -->
    <!-- # Enable header wire + context logging - Best for Debugging -->
    <!--
    <Logger name="org.apache.http" level="debug" />
    <Logger name="org.apache.http.wire" level="error" />
    -->

    <!-- SNIP -->

  </Loggers>

</Configuration>
So, if you want to change the log level for org.apache.http category to debug level for instance, you can simply add (or uncomment) the following logger element in log4j2.xml file before launching JMeter.
  <Loggers>
    <!-- SNIP -->
    <Logger name="org.apache.http" level="debug" />
    <!-- SNIP -->
  </Loggers>
For more detail on how to configure log4j2.xml file, please see Apache Log4j 2 Configuration page.
Log level for specific categories or root logger can be overridden directly on the command line (instead of modifying log4j2.xml) as well. To do so, use the following options:
- -L[category]=[priority]
- Overrides a logging setting, setting a particular category to the given priority level. Since 3.2, it is recommended to use a full category name (e.g, org.apache.jmeter or com.example.foo), but if the category name starts with either jmeter or jorphan, org.apache. will be prepended internally to the category name input to construct a full category name (i.e, org.apache.jmeter or org.apache.jorphan) for backward compatibility.
Examples:
jmeter -Ljmeter.engine=DEBUG
jmeter -Lorg.apache.jmeter.engine=DEBUG
jmeter -Lcom.example.foo=DEBUG
jmeter -LDEBUG
Differences in Logging : Old vs New Practices:
As JMeter uses SLF4J as logging API and Apache Log4j 2 as a logging framework since 3.2, not every log level used before 3.2 can match exactly with one of the new available log levels provided by SLF4J/Log4j2. Therefore, please keep the following differences and new suggested practices in mind if you need to migrate any existing logging configurations and logging code.
| Category | Old Practices Before 3.2 | New Practices Since 3.2 |
|---|---|---|
| Logger Reference |
Logger reference through LoggingManager:
LoggingManager.getLoggerFor(String category); LoggingManager.getLoggerForClass(); |
Use SLF4J API with either category or explicit class:
LoggerFactory.getLogger(String category); LoggerFactory.getLogger(Foo.class); |
| Log Levels in Configuration or Command Line Arguments |
Old Log Levels:
|
Mapping to New Levels through SLF4J/Log4j2:
Since FATAL_ERROR is not supported by SLF4J API,
it is treated as ERROR instead for existing code not to break.
There is also the FATAL log level option.
TRACE level, which is less specific than DEBUG, is supported additionally since 3.2.
Look up SLF4J or Apache Log4J 2 documentations for details.
|
If JMeter detects an error during a test, a message will be written to the log file. The log file name is defined in the log4j2.xml file (or using the -j option, see below). It defaults to jmeter.log, and will be found in the directory from which JMeter was launched.
The menu displays the log file in a bottom pane on main JMeter window.
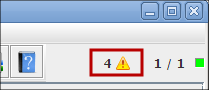
In the GUI mode, the number of error/fatal messages logged in the log file is displayed at top-right.
The command-line option -j jmeterlogfile allow to process after the initial properties file is read, and before any further properties are processed. It therefore allows the default of jmeter.log to be overridden. The jmeter scripts that take a test plan name as a parameter (e.g. jmeter-n.cmd) have been updated to define the log file using the test plan name, e.g. for the test plan Test27.jmx the log file is set to Test27.log.
When running on Windows, the file may appear as just jmeter unless you have set Windows to show file extensions. [Which you should do anyway, to make it easier to detect viruses and other nasties that pretend to be text files …]
As well as recording errors, the jmeter.log file records some information about the test run. For example:
2017-03-01 12:19:20,314 INFO o.a.j.JMeter: Version 3.2.20170301
2017-03-01 12:19:45,314 INFO o.a.j.g.a.Load: Loading file: c:\mytestfiles\BSH.jmx
2017-03-01 12:19:52,328 INFO o.a.j.e.StandardJMeterEngine: Running the test!
2017-03-01 12:19:52,384 INFO o.a.j.e.StandardJMeterEngine: Starting 1 threads for group BSH. Ramp up = 1.
2017-03-01 12:19:52,485 INFO o.a.j.e.StandardJMeterEngine: Continue on error
2017-03-01 12:19:52,589 INFO o.a.j.t.JMeterThread: Thread BSH1-1 started
2017-03-01 12:19:52,590 INFO o.a.j.t.JMeterThread: Thread BSH1-1 is done
2017-03-01 12:19:52,691 INFO o.a.j.e.StandardJMeterEngine: Test has ended
The log file can be helpful in determining the cause of an error, as JMeter does not interrupt a test to display an error dialogue.
1.4.8 Full list of command-line options
Invoking JMeter as "jmeter -?" will print a list of all the command-line options. These are shown below.
    --?
        print command line options and exit
    -h, --help
        print usage information and exit
    -v, --version
        print the version information and exit
    -p, --propfile <argument>
        the jmeter property file to use
    -q, --addprop <argument>
        additional JMeter property file(s)
    -t, --testfile <argument>
        the jmeter test(.jmx) file to run
    -l, --logfile <argument>
        the file to log samples to
    -i, --jmeterlogconf <argument>
        jmeter logging configuration file (log4j2.xml)
    -j, --jmeterlogfile <argument>
        jmeter run log file (jmeter.log)
    -n, --nongui
        run JMeter in nongui mode
    -s, --server
        run the JMeter server
    -H, --proxyHost <argument>
        Set a proxy server for JMeter to use
    -P, --proxyPort <argument>
        Set proxy server port for JMeter to use
    -N, --nonProxyHosts <argument>
        Set nonproxy host list (e.g. *.apache.org|localhost)
    -u, --username <argument>
        Set username for proxy server that JMeter is to use
    -a, --password <argument>
        Set password for proxy server that JMeter is to use
    -J, --jmeterproperty <argument>=<value>
        Define additional JMeter properties
    -G, --globalproperty <argument>=<value>
        Define Global properties (sent to servers)
        e.g. -Gport=123
         or -Gglobal.properties
    -D, --systemproperty <argument>=<value>
        Define additional system properties
    -S, --systemPropertyFile <argument>
        additional system property file(s)
    -f, --forceDeleteResultFile
        force delete existing results files and web report folder if present before starting the test
    -L, --loglevel <argument>=<value>
        [category=]level e.g. jorphan=INFO, jmeter.util=DEBUG or com.example.foo=WARN
    -r, --runremote
        Start remote servers (as defined in remote_hosts)
    -R, --remotestart <argument>
        Start these remote servers (overrides remote_hosts)
    -d, --homedir <argument>
        the jmeter home directory to use
    -X, --remoteexit
        Exit the remote servers at end of test (CLI mode)
    -g, --reportonly <argument>
        generate report dashboard only, from a test results file
    -e, --reportatendofloadtests
        generate report dashboard after load test
    -o, --reportoutputfolder <argument>
        output folder for report dashboard
Note: the JMeter log file name is formatted as a SimpleDateFormat (applied to the current date) if it contains paired single-quotes, .e.g. 'jmeter_'yyyyMMddHHmmss'.log'
If the special name LAST is used for the -t, -j or -l flags, then JMeter takes that to mean the last test plan that was run in interactive mode.
1.4.9 CLI mode shutdown
Prior to version 2.5.1, JMeter invoked System.exit() when a CLI mode test completed. This caused problems for applications that invoke JMeter directly, so JMeter no longer invokes System.exit() for a normal test completion. [Some fatal errors may still invoke System.exit()] JMeter will exit all the non-daemon threads it starts, but it is possible that some non-daemon threads may still remain; these will prevent the JVM from exiting. To detect this situation, JMeter starts a new daemon thread just before it exits. This daemon thread waits a short while; if it returns from the wait, then clearly the JVM has not been able to exit, and the thread prints a message to say why.
The property jmeter.exit.check.pause can be used to configure the delay before printing non-daemon threads. If set to 0 (default value), then JMeter does not print non-terminated threads at the end of the test.
1.5 Configuring JMeter
If you wish to modify the properties with which JMeter runs you need to either modify the user.properties in the /bin directory or create your own copy of the jmeter.properties and specify it in the command line.
Parameters
The command line options and properties files are processed in the following order:
- -p propfile
- jmeter.properties (or the file from the -p option) is then loaded
- -j logfile
- Logging is initialised
- user.properties is loaded
- system.properties is loaded
- all other command-line options are processed
See also the comments in the jmeter.properties, user.properties and system.properties files for further information on other settings you can change.